
- Details
- Category: Gear
- Hits: 1503
As you may know, I have been running a BrewPi controller for some time. I built one of the old school Arduino controllers and ran BrewPi on a VM. It was time to upgrade. Part of it was driven by the fact that the Legacy branch was no longer supported. I was looking to move from VM to hardware - the server I ran it on was noisy, power hungry, and had to relocate. I was looking at OrangePi devices. Think RaspberryPi but less expensive. I needed something along these lines to run my brewery controls anyway so I ordered one.
When it came in I threw a quick image on it. Use the Armbian ones, not the OrangrPi supplied ones. Fired it up. Installed Fermentrack and plugged in my Arduino controller by USB. Added the controller, and wa DONE. 20 minutes total.
I have not yet added my iSpindel (It has both iSpindel and Tilt support) but will do that soon - building a new iSpindel so starting fresh. It's been rock solid and not one issue with it.
- Details
- Category: Gear
- Hits: 3184
I recently had the opportunity to play around with an iSpindel device - DIY floating hydrometer. It took a little bit of trial and error, a lot of learning Python, and of course a generous about of beer, but I was able to get it to feed data into my BrewPi setup. Yes, I haveseen the BrewPiless with it already integrated. As well as a few other implementations of it but all of them had two major drawbacks. First, I would need some more hardware. My current BrewPi runs on a VM on a server at home, and uses a super cheap Arduino Uno. Second, my BrewPi is fully functional for what I need, right now. So no delay in getting another batch fermenting.
Are there some flaws in how I have it set up? Sure. but it is stable. First, and biggest issue for me, is the graphing is slow on mobile devices after a couple days. I think it is the extra data points. Currently I ahve SG, Temp and battery plotted. I plan on leaving only the SG in the database. After that I will see what else slows it down. Next, it is a "manual" installation, in that there are a few changes that have to be made, and files copied manually. I just haven't written an install script yet.
So far, I have been extremely happy with the performance. Accuracy seems pretty good too considering the calibration on this was done rather quickly. Below you can see a screenshot of a brew going right now. Just looking at the graph I can tell my SG has been almost flat for a couple days. No taking a sample to read, no opening the fermenter. Couple more days it can go into a keg.
Check it out at https://github.com/NFBrewingTech/BrewPi-iSpindel if you want to play around with it. Submit requests if you want anything added or changed. Currently only on the Legacy branch of BrewPi

- Details
- Category: Gear
- Hits: 1735
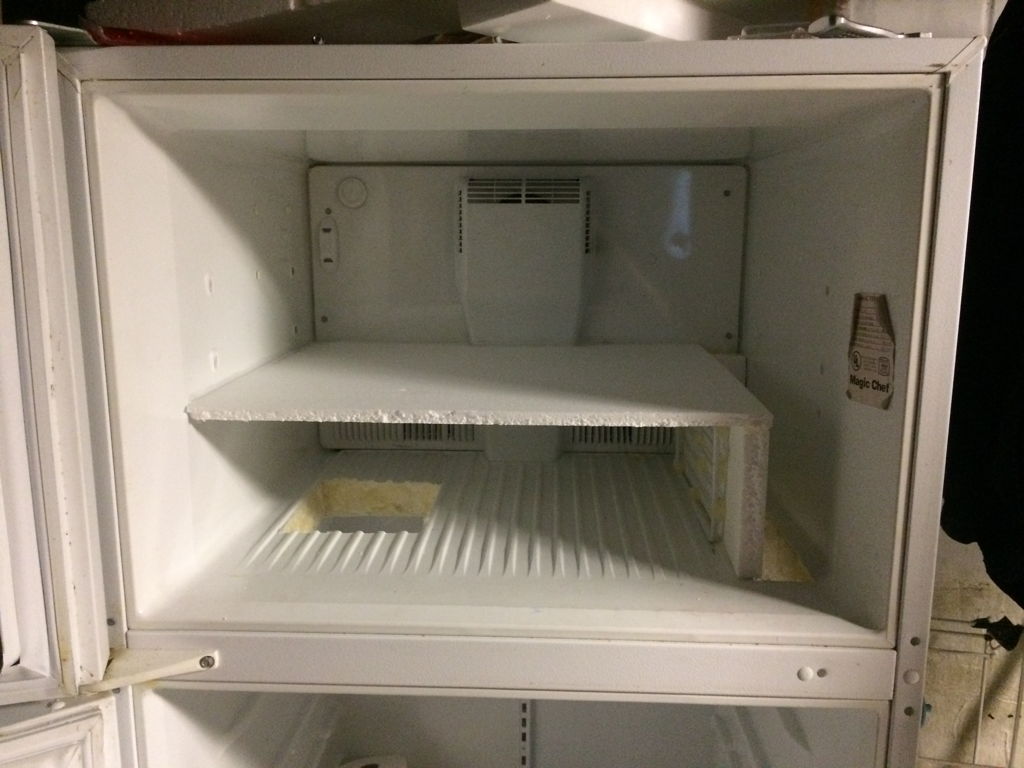
After just a couple of batches I started thinking about how to control my temperatures. Had my eyes on a couple of clone recipes that are temperature specific. Luckily a few months later my fridge seemed to be starting to give out. Making a burning smell - which turned out to be plastic overheating from the door being left open and light left on. So, since we had a new fridge on the way, I looked at using the old one for fermentation.
First thing I did was gut the inside. Shelves out, inside door panels removed, and a good cleaning. So I am sitting here with it running, feel the freezer getting cold, and the fridge getting cooler. Start thinking. If I am not going to use the freezer, why not eliminate it. What I did was this - cut two holes from fridge to freezer, to allow air to circulate better than through the one small existing vent. Next, I built some baffles, to allow it to channel the cooled air more directly to the fridge chamber. Essentially forcing it to pass through the fridge, rather than cooling the freezer.
I also needed heat. Since I brew in the basement, and the temperature ranges between 64 and 75, a very good part of the year I need heat for regular ale fermentation. I picked up a small space heater. The Lasko #100 MyHeat works great for this for a few reasons. First, it is a low wattage so it isn't going to heat up really fast. Second it has a temperature cutoff so if by some chance your controller doesn't turn off, it will shut itself off before it gets too hot. And finally, the thing is tiny so it is real easy to fit it in
Here you can see the baffle in the freezer, with the front piece taken off. Cold air coming out the top then flowing down, warmer air coming up on the left and drawn in to be cooled. More to come soon
Update: Have the first brew running in this now, and wow what a difference. Before I had to fight to keep it within a 5 or 6 degree temperature range. This time, I have kept within a half degree of my target. One minor problem - and of course the day after I flew across the country. I had some kind of power issue at home and lost communication between the server and arduino. The arduino came back up and was holding the temperature perfectly, so all I lost was the logging and ability to make changes. I had this system up and running for months, and had several outages, but this is the first time an outage caused an issue.
Full build pictures coming soon
- Details
- Category: Gear
- Hits: 2964
[sigplus] Critical error: The Graphics Draw (gd) or ImageMagick (imagick) image processing library has to be enabled in the PHP configuration to generate thumbnails.
As I am using more grain in my brews, I finally grabbed a grinder. Since I am on a budget, for now I am using a modified version of this Victoria hand grinder.
I did make a couple of modifications to make it a little more suitable for our uses. First, to make sure we have a coarse enough grain, I spaced the grinding head support out with a couple washers. This will let us open it up for coarse grinds instead of being clamped down tight for grinding flour. The next thing that I noticed, once I had the spacing opened up it didn't seem to stay open. What I found is this. the adjustment is done by screwing in the single thumbscrew, which presses in on the shaft. Well, inside the bore where the shaft seats is a ball bearing held in by a snapring. This snapring is tight enough that when you back the thumbscrew off it doesnt open the grind plates at all. Maybe with grain in there it would be different but I am not sure. To be safe I removed the snapring, to make sure that my grind gets coarser when I need it to
{gallery id=mill1 rows=2 cols=3 width=100 height=100 crop=1 labels=captions alignment=center orientation=horizontal buttons=0 links=0 counter=0 overlay=1}Mill{/gallery}
{gallery}Mill{/gallery}
Next, so I wasn't hand grinding everything we took the handle retainer thumbscrew out and replaced it with a regular hex-head bolt, locked in place with a nut. This allows us to use a drill with socket attachment to turn the grinder. If you have the same grinder from the link above you just need a 5/16 bolt and nut for this.
- Details
- Category: Gear
- Hits: 1358
A great place to start is with a pre-built kit. Yes, you could buy everything individually, and if you order from a bunch of different places you might save a couple dollars - however sometimes you can get a deal. For example, Adventures in Homebrewing has a deal where you buy the kit, get free shipping on the kit - and get a free ingredient kit to go with it. If you've got a kettle at home and get one of these kits you are good to go. You will probably want to add on some sanitizer too, I prefer StarSan.
Looking at prices quick - easily have everything you need to get started for under $100
Page 1 of 2
- You are here:
-
Home

- Gear